How to Configure SQL Server Always On High Availability Group
MSSQL How to configure AG in SQL Server standard edition, How to configure Always on in SQL Server, SQL Server Always on configuration, SQL Server Always on setupWhat is Always On in SQL Server – Always On is High Availability(HA) and Disaster Recovery(DR) solution that maximizes database availability for Business to run as usual with minimum impact. Please go though this link to get more details on Always On Availability Group.
Following are the step by step process to configure Always On Availability group (Basic Availability Group(BAG) Setup) in SQL Server 2019 Standard Edition on Windows environment. Please visit this link to get more details on BAG.
Step#1: Enable AG on all the participating nodes
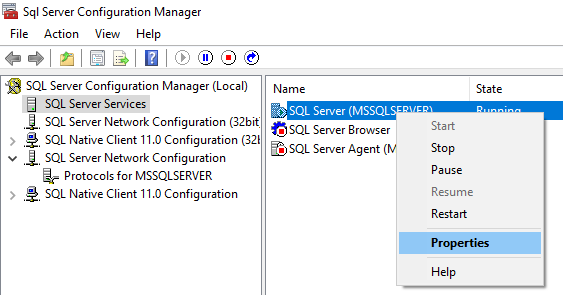
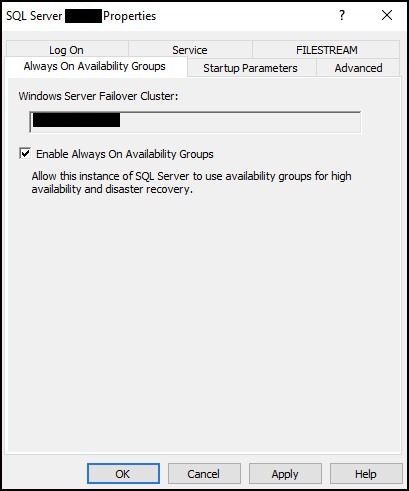
Open SQL Server Configuration Manager — > Click on SQL Server Services — > right click on SQL Server properties — > click on tab Always On Availability Groups — > enable Always On Availability Groups check box
It will prompt you to restart SQL Server service for above setting to take effect. Repeat the same steps for Secondary replica as well.
Step#2: Create Master key and Certificate on Primary Replica
SQL Server uses certificates to authenticate communication between mirroring endpoints. so, we will create master key followed by certificates and other steps as mentioned below.
CREATE MASTER KEY ENCRYPTION BY PASSWORD ='xxxxxx'
go
CREATE CERTIFICATE ALWYSON_certificate WITH SUBJECT = 'ALWYSON_subject'
go
BACKUP CERTIFICATE ALWYSON_certificate
TO FILE = 'D:/SQL/ALWYSON_certificate.cer'
WITH PRIVATE KEY (
FILE = 'D:/SQL/ALWYSON_certificate.pvk',
ENCRYPTION BY PASSWORD = 'xxxxxx' — keep same password as above
)
go
once certificates are created, we can run below command to verify it.
SELECT name, certificate_id, principal_id, pvt_key_encryption_type_desc, start_date, expiry_date FROM sys.certificates;

Now, copy both the files, certificate file (ALWYSON_certificate.cer) and private key file (ALWYSON_certificate.pvk) at same location on Secondary Replica.
Step#3: Create Master key and Certificate on Secondary Replica
CREATE MASTER KEY ENCRYPTION BY PASSWORD ='xxxxxx'
go
CREATE CERTIFICATE ALWYSON_certificate
FROM FILE = 'D:/SQL/ALWYSON_certificate.cer'
WITH PRIVATE KEY (
FILE = 'D:/SQL/ALWYSON_certificate.pvk',
DECRYPTION BY PASSWORD = 'xxxxxx' — use primary replica password
)
go
Step#4: Create Mirroring Endpoint for Primary/Secondary Replica:
To participate in Always On availability groups or database mirroring, a server instance requires its own, dedicated database mirroring endpoint. Database mirroring endpoints uses TCP to send and receive messages between the server instances participating in database mirroring sessions or hosting availability replicas. The database mirroring endpoint listens on a unique TCP port number.
Run below command on Primary as well as on Secondary Replica.
CREATE ENDPOINT [EP_SQLAG]
AS TCP (LISTENER_PORT = 5022)
FOR DATABASE_MIRRORING (
ROLE = ALL,
AUTHENTICATION = CERTIFICATE ALWYSON_certificate,
ENCRYPTION = REQUIRED ALGORITHM AES
)
go
ALTER ENDPOINT [EP_SQLAG] STATE = STARTED;
Step#5: Create Availability Group on Primary Replica:
CREATE AVAILABILITY GROUP [test_AG1]
WITH (BASIC , CLUSTER_TYPE = NONE)
FOR REPLICA ON
N'Node1' — Put Primary replica hostname
WITH (
ENDPOINT_URL = N'tcp://Node1:5022',
AVAILABILITY_MODE = SYNCHRONOUS_COMMIT,
FAILOVER_MODE = MANUAL,
SEEDING_MODE = AUTOMATIC
),
N'Node2' — Put Secondary replica hostname
WITH (
ENDPOINT_URL = N'tcp://Node2:5022',
AVAILABILITY_MODE = SYNCHRONOUS_COMMIT,
FAILOVER_MODE = MANUAL,
SEEDING_MODE = AUTOMATIC
);
ALTER AVAILABILITY GROUP [test_AG1] GRANT CREATE ANY DATABASE;
Step#6: Join Secondary Replica to Always On Availability Group:
ALTER AVAILABILITY GROUP [test_AG1] JOIN WITH(CLUSTER_TYPE=NONE)
go
ALTER AVAILABILITY GROUP [test_AG1] GRANT CREATE ANY DATABASE
go
Step#7: Adding Database to Always On Availability Group:
ALTER DATABASE [test] SET RECOVERY FULL WITH NO_WAIT
go
BACKUP DATABASE [test] to disk='D:/SQL/test_AGBACKUP.bak'
go
ALTER AVAILABILITY GROUP [test_AG1] ADD DATABASE [test]
go
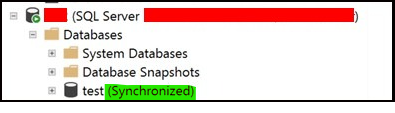
Once above steps are completed fine, we should see primary and Secondary database to be in Synchronized state.
Note: for bigger databases, you would see Secondary replica in RESTORING state and it should get in sync after some time.
Primary SQL Server:

Secondary SQL Server:
Note: Since we are configuring AG using automatic seeding, no need to create database on DR side as automatic seeding process will take care of database creation during this process. If database already exists on DR side and we are setting up AG using automatic seeding , then AG setup might get completed and doesn't throw any error, but you may not see DR database in Synchronize mode.
Below query can be used to monitor currently running automatic seeding process on DR server and this query is referred from Microsoft site. You can keep monitoring value of transferred_size_bytes and database_size_bytes to get an idea as in how long will it take for DR database to get in sync.
SELECT local_database_name,
role_desc,
internal_state_desc,
transfer_rate_bytes_per_second,
transferred_size_bytes,
database_size_bytes,
start_time_utc,
end_time_utc, estimate_time_complete_utc,
total_disk_io_wait_time_ms,
total_network_wait_time_ms,
is_compression_enabled
FROM sys.dm_hadr_physical_seeding_stats
I hope this post would have helped you in understanding basics of AG and setting up the same. If you have any suggestions please put your comments below. Thank you.